How to password-protect an external drive on Mac: Secure your data from hackers
Here’s an easy way for Mac users to securely store their passwords or important files on an external hard drive or USB drive, ensuring they’re safe from thieves and hackers.
All you need to do is buy an external hard drive or USB stick from a shop like Officeworks or JB Hi-Fi, go through a short process to erase it and encrypt it, then store it somewhere handy. Each time you insert it into your Apple Mac you’ll be asked for a password to unlock it.
Why you should create a secure USB drive
There are two main reasons why you should password-protect an external drive on Mac:
Firstly, to have somewhere where you can write down your passwords and know that they can’t be stolen and seen by someone else.
We’re being asked to create longer, more intricate passwords these days, which is bad news in particular for older people and those with naturally bad memories. For obvious reasons, reusing the same password for everything poses significant security risks.
There are some great password managers for Mac data security, like 1Password, but let’s face it, people are much more likely to write their usernames, passwords and PINs down in a notepad and leave it near their computer, or they’ll write them down in a file that they keep on their Mac. Both of these are perfect for anyone who breaks in and steals your Mac, and the second is great for hackers.
Secondly, an encrypted external hard drive gives you somewhere to store important documents, like work contracts, personal financial records or wills, keeping them protected from unauthorised access.
Step-by-step guide: How to password-protect an external drive for Mac
Step 1: Insert your USB drive
Make sure it doesn’t have anything on it you want to keep – this process will erase all data from the drive.
Step 2: Open Disk Utility
Go to the Applications folder on your Mac, open the Utilities folder and select Disk Utility.
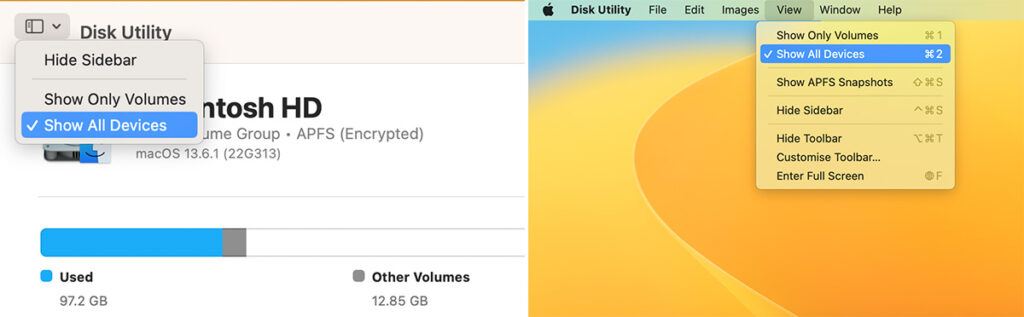
Step 3: Show all devices
Go to the View menu item at the top of the screen and select Show All Devices. (You can also do this via the View icon to the top left of the Disk Utility window.)
Step 4: Select the drive
There should be a sidebar showing the external drives to the left of the Disk Utility window. If you can’t see it, select Show Sidebar from the View menu. In the sidebar, under External, you should now see the device name (the manufacturer’s name for the external drive – SanDisk Cruzer Facet or similar) with the volume name under it (this is probably something like USB, or will be the name you’ve given the drive).
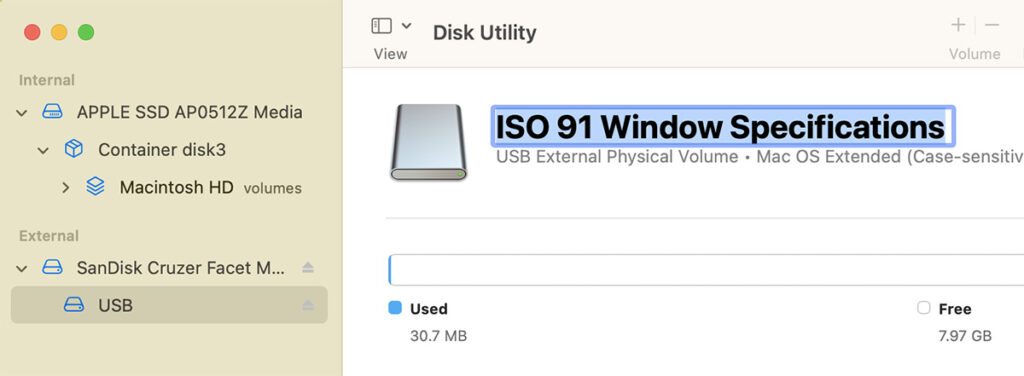
Step 5: Give the drive a boring name
Choose the device in the sidebar and click on the Erase menu icon or go to Edit > Erase. A new task window will pop up with a prompt to name the drive, or volume. I always like to give the drive a really boring name that won’t entice someone to try and hack it. ‘ISO 91 Window Specifications’, for example, holds a lot less promise than ‘Dave’s Passwords’.
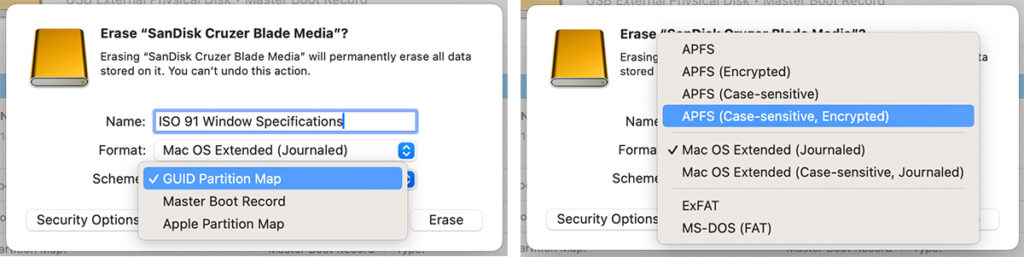
Step 6: Choose a secure format and erase the drive
In the same window, go to Scheme and choose GUID Partition Map, then go to Format, choose APFS (Case-Sensitive, Encrypted) and enter and verify a password. Make this a unique and hard-to-crack one, but also one you can remember – having gone to the effort to make this drive unbreakable, you don’t want to have to write the password down somewhere. Then write a password hint in the box – making sure it’s obscure and doesn’t give a hint anyone would understand – and click Erase.
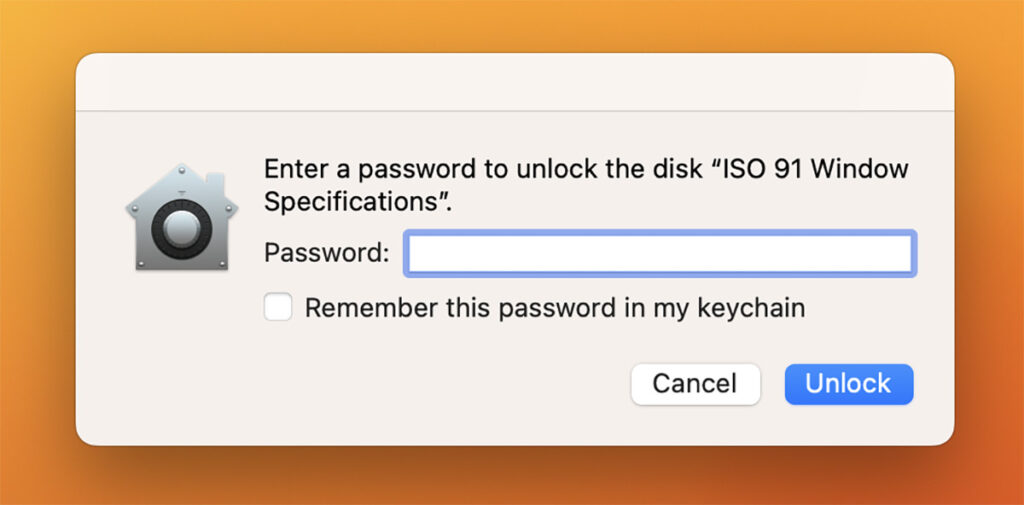
That’s it. The next time you insert the drive you will have to use the password to unlock it.
Hard drive security tips
Tip 1: Don’t remember the password in Keychain
In the password window, never tick “Remember this password in my keychain”. If you do, then the drive won’t need a password the next time it’s inserted into your Mac, and you’ll need to do this all over again, or erase the password from the keychain, which is a bit of a pain to do.
Tip 2: Always disconnect your drive
Never leave your external drive attached to your Mac. Plug it in, do what you need to do, and eject it properly. Leaving it in will make it available to anyone who can access your computer.